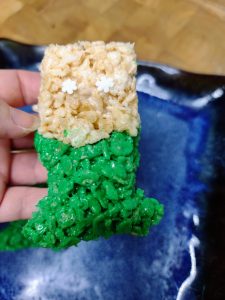
These stocking Rice Krispie Treats are perfect for making while waiting for St. Nick to come visit! They are so much fun and also easy to put together.
How to Make Stocking Rice Krispie Treats
Who doesn't love a good food craft? We surely do (you can probably tell what with all of them here and all).
But seriously, the other day we made some Red rice Krispie treats and wanted to do several different things with them. Colored rice Krispie Treats are fun because you can get any color you want (flavor of the treats don't change) and then decorate them til your hearts content.
These stocking rice Krispie treats are perfect for winter holiday time. They're a great craft for kids or adults alike. We made them along with these Santa Rice Krispie Treats for double the Christmas cheer.
Step One
You are basically going to be making red rice krispie treats to start.
The first thing you need to do is gather your butter and marshmallows.you want to melt them together. You can do this on the stovetop in a pot or in a bowl in the microwave.
Either way you choose, you need to do so slowly to make sure that you don't over or under melt he marshmallows and butter. This process takes several minutes on the stovetop and you need to be present to stir your mixture.
If you do it in the microwave you can start at a minute or so and then check it. Do 30 second intervals after that checking at the end of each until your mixture is thoroughly melted.
Step Two
once your butter and marshmallows have melted you want to add in your food coloring.the amount of food coloring you add depends on how dark you want your red to be.
We were going for a true dark holiday red so we added several drops. Make sure to stir everything together and check the color once done. Keep in mind, once you add in your cereal the color will lighten some so you want your initial color to be a little darker than you wanted to end up being.
Step Three
Next you're going to pour in your Rice Krispies cereal. Dump it in to your colored marshmallow mixture and then stir everything together thoroughly.
Make sure that everything is evenly distributed so you don't have any chunks of just cereal or any chunks of just marshmallow.
Step Four
Now, take your pre-greased or non-stick pan and add in your Rice Krispies and marshmallow mixture. You'll want to use a pre-greasedspatula as well to make it easy to spread. We like to use a nonstick, non-flavored cooking spray for this.
Once your entire mixture is added to your pan use your spatula to spread it evenly into the pan. You want to try to make sure that it is even throughout.
Pop your pan into the refrigerator and the light are Rice Krispies sit. This doesn't take too long, 10 or 15 minutes should be plenty. Basically you want them to be cooled.
You can also let them cool on the counter, this will take a little longer than the refrigerator.
Step Five
Now that your Rice Krispies have cooled they will be set and a little bit harder. Now is the time to use your cookie cutter and start decorating.
Grab your stocking shaped cookie cutter and go ahead and start cutting out pieces from your Rice Krispie Treat pan.
Unless you have a rather large cookie cutter, most times the Rice Krispie treats are pretty thick compared to the cookie cutter and you may need to use a knife or other spatula to help take your shape out of the pan.
Once you have all your stockings cut out, you can start decorating. We used white icing with a star point tip. And some mini marshmallows.
First take your white icing and place it on the top of the stocking where you would normally find the fur. next you can place you and mini marshmallows in a row on top of the white icing to add a little extra poof.
If you want to get more fancy or creative, you could draw your name on the stocking or add sprinkles or other decorations also.


